Thursday, January 24, 2019
Soup in the Instant Pot
I know that soup is a popular type of recipe in the instant pot, but so far this is the first one that I've made. I was initially resisting the instruction to dump it all in and turn it on without sauteing the onions or browning the chicken, but I needed a quick meal on a busy evening so I followed the instructions - measured, dumped, and pressed the button. Because I haven't made something with so much liquid before, I was worried that I pressed something wrong because it took a lot longer than normal to come up to pressure and start counting down the minutes. I texted my sister about this and she told me it would be okay . . . and it was!
Bottom line: Although the setting is for 13 minutes of pressure cooking, plan on 40 minutes total start to finish. I don't think it would have been any better with additional steps of sauteing so go ahead and put all the ingredients in and start it up.
Recipe notes: No instant pot? I think the same results could be achieved with 4-6 hours in a slow cooker. My kids added sour cream and all 3 ate it! I wanted more spice which I achieved with the optional chopped jalepenos. Chicken breasts would probably work just as well.
White Chicken Chili (non-dairy / Instant Pot)
serves 6
Original Recipe from A Pinch of Healthy
1.5 lbs boneless, skinless chicken thighs
5 cups chicken broth or stock
2 cans white beans (like cannelini), drained and rinsed
1 can diced green chilis (mild)
1 medium onion, diced
2 garlic cloves, minced
1 tsp oregano
1 tsp cumin
1 tsp ground black pepper
1/2 tsp chili powder
1/2 tsp salt
For serving: chopped cilantro, chopped jalapenos, sour cream (all optional)
Add all the ingredients (except cilantro, jalapenos, and sour cream) to the instant pot. Place the lid on and lock it. Make sure the valve is seat to "sealing." Use the manual setting to pressure cook for 13 minutes. Do a quick release. Remove the chicken thighs and shred them with two forks. Return to the pot and serve immediately. Serve the cilantro, jalapenos, and sour cream on the side.
4sp (0sp with chicken breasts)
Friday, December 28, 2018
Non-traditional holiday dessert
![]() |
| Thanksgiving 2018 |
Our dessert choices reflected our non-traditional year . . . no-one really wanted apple pie or pumpkin pie so I made this gingerbread pumpkin dessert and Big made a new recipe - a lemon lava cake. Big loves lemon desserts, is really into baking lately, and came up with this idea. We read several recipes online before determining that we didn't want one that was mostly white chocolate. A lot of these take a chocolate lava cake and use white chocolate and lemon instead. What we came up with turned out delicious . . . especially with some of our orange cranberry sauce from Thanksgiving dinner on top! In the future, we thought of incorporating fresh blueberries or a blueberry sauce as well.
Recipe notes: You can make your own lemon curd, or buy it. We used the Trader Joe's one. These amounts are little funky because I was converting from metric weights.
Lemon Lava Cakes (makes 6)
from Seasons and Suppers blog
7 T unsalted butter, softened (plus more for greasing the ramekins)
5 T white sugar (plus 1 T for dusting the ramekins)
2 eggs
2 T whole milk
1 tsp lemon zest
3/4 cup + 1 T all-purpose flour
6 T lemon curd
Preheat oven to 400 degrees. Butter six ramekins and coat them with white sugar. Set aside.
In a large bowl, beat the butter and sugar until fluffy. Lightly beat the eggs and gradually add them to the bowl, beating all the time. Add the milk and lemon zest. Add the flour and incorporate well.
Fill each ramekin about 1/3 full of the batter. Using a spoon, make a little well in the middle by pushing the batter away from the middle to the sides. Place about 1 T of the lemon curd in the well you made, then cover the curd with more batter until the ramekin is 2/3 - 3/4 full. Repeat with remaining ramekins and place filled ramekins on a baking sheet.
Bake for 15-20 minutes or until the tops are golden and the cakes spring back when touched. When you remove them from the oven, immediately run a knife around the edges of the ramekins before turning them out on to plates. Serve right away.
Monday, December 17, 2018
Peppermint Shortbread Cookies
I meant to go backwards and post about our fall . . . along with some good recipes I've made . . . but sometimes going back is too hard. So onward to the "most wonderful time of the year"! I'm getting ready to bake this week and wanted to share this one from the Julienne cookbook that I really enjoyed last Christmas. Before the recipe, here are some of our holiday antics (so far).
Peppermint Shortbread Cookies (makes 3-4 dozen)
From “Celebrating with Julienne”
3/4 cup (1.5 sticks) unsalted butter, room temperature
1/2 cup granulated sugar
2 T (packed) golden brown sugar
1 extra large egg
1.5 tsp peppermint extract
1/2 tsp vanilla extract
2 cups unbleached all purpose flour
1/8 tsp. salt
2 oz bittersweet chocolate (60% cacao or more), chopped
Using a stand mixer with the paddle attachment, beat butter, granulated sugar, and brown sugar in a large bowl until light and fluffy. Beat in the egg, peppermint extract, and vanilla. Add the flour and salt and mix until a soft dough forms. Divide the dough into 3 equal pieces. Roll each piece into a 1.5 inch diameter log about 4 inches long. It works best to roll it on plastic wrap. Then, wrap hte log with plastic and enclose completely. Repeat with the remaining dough, forming 3 logs total.
Refrigerate for at least 2 hours or until firm.Preheat oven to 350 degrees. Line baking sheets with parchment paper. Cut the logs crosswise into slices approximately 1/4 inch thick. Arrange dough rounds on baking sheets and bake until light brown around the edges, about 5 minutes. Cool for 5 minutes on baking sheets before transferring to wire racks to cool completely.
Melt the chocolate in a double boiler and dip half of each cookie in the melted chocolate. Let the chocolate set completely before storing in an airtight container.
![]() |
| Christmas themed "Escape Game" -we made it! |
![]() |
| Last year's preschool craft, measured to last year's height |
![]() |
| Tree lighting fancy dinner with just our little |
| Christmas Carol performance - dressed to go onstage! |
![]() |
| Decorating the tree |
![]() |
| Sister love by the Christmas tree |
![]() |
| Secrets with Santa |
![]() |
| Journey to Bethlehem |
![]() |
| Cooking with our friends from Hawaii who came to visit! |
Peppermint Shortbread Cookies (makes 3-4 dozen)
From “Celebrating with Julienne”
3/4 cup (1.5 sticks) unsalted butter, room temperature
1/2 cup granulated sugar
2 T (packed) golden brown sugar
1 extra large egg
1.5 tsp peppermint extract
1/2 tsp vanilla extract
2 cups unbleached all purpose flour
1/8 tsp. salt
2 oz bittersweet chocolate (60% cacao or more), chopped
Using a stand mixer with the paddle attachment, beat butter, granulated sugar, and brown sugar in a large bowl until light and fluffy. Beat in the egg, peppermint extract, and vanilla. Add the flour and salt and mix until a soft dough forms. Divide the dough into 3 equal pieces. Roll each piece into a 1.5 inch diameter log about 4 inches long. It works best to roll it on plastic wrap. Then, wrap hte log with plastic and enclose completely. Repeat with the remaining dough, forming 3 logs total.
Refrigerate for at least 2 hours or until firm.Preheat oven to 350 degrees. Line baking sheets with parchment paper. Cut the logs crosswise into slices approximately 1/4 inch thick. Arrange dough rounds on baking sheets and bake until light brown around the edges, about 5 minutes. Cool for 5 minutes on baking sheets before transferring to wire racks to cool completely.
Melt the chocolate in a double boiler and dip half of each cookie in the melted chocolate. Let the chocolate set completely before storing in an airtight container.
Sunday, September 16, 2018
Pineapple Cole Slaw
This summer my husband made lots of delicious ribs and it was a great way to feed a crowd when we had friends over. I usually just make a big salad and have some fruit to go with it but one day I was inspired to make a new coleslaw as a side dish. I like non-mayonaise based coleslaws and this one has a little creaminess from the greek yogurt but fits my criteria of "no mayo!" The sugar is optional - if your pineapple is super sweet, you probably won't need it or miss it. If you like a little kick, add the diced jalapeño.
Pineapple Coleslaw (makes 6 cups)
1/2 cup plain Greek yogurt (nonfat is ok)
1 T white wine vinegar
1 T rice wine vinegar
3 T pineapple juice (from canned pineapple or fresh)juice of 1 lime
1/2 cup green onions, chopped
1/3 cup chopped cilantro
2 cups pineapple bits (diced fresh or from a can, drained)
5 cups shredded green cabbage
salt and pepper to taste
jalapeno, diced (optional)
1 T raw sugar (optional)
Whisk together yogurt, vinegars, pineapple juice, lime juice, salt and pepper, jalapeño and sugar (if using) until well-blended. Toss with the onions, pineapple, and cabbage. Refrigerate for at least an hour. Mix in the cilantro before serving.
Sunday, August 26, 2018
Cooking Class: Part II
When the girls wanted to make lasagna as part of the cooking class, I decided we would learn two things: how to make a marinara sauce (instead of using a jar) and how to layer a lasagna. That way, they could use those two skills to make different kinds of pasta and to make variations on a traditional lasagna. We made two pans at once so there was lots of hands on layering for everybody. Here's a link to the lasagna on this blog which we used as a base recipe, just with a homemade sauce: Lasagna
The second lesson in "sauce" was the homemade salsa. I'll do a pico de gallo or black bean salsa sometimes, but a smooth basic salsa is something I basically never do. Living in an urban area with Trader Joe's and Sprouts within a mile of me, I have lots of great salsa on hand all the time. It was good to make a batch and realize how easy and satisfying it is to make your own. We sliced corn tortillas with a pizza slicer and baked them to make our own chips too! My husband split the batch of salsa in half and since we didn't have a jalapeño, he sautéed some red pepper flakes in olive oil until crispy and added that mixture to his half to make a spicy salsa. Yum!
Both of these recipes were chosen for being "kid-friendly" in terms of the cooking method and the taste. When you're building sauces around canned tomatoes, I think the quality of the canned tomatoes matters. I spent a little more and bought a little higher quality than I might for other types of recipes. Let me know what your kids are cooking!
Basic Marinara Sauce (makes about 3 cups)
1 T olive oil
1 small onion, diced
2-3 cloves garlic, minced
1 28 oz can tomatoes (I used whole peeled San Marzano tomatoes)
1 bay leaf
1 tsp. salt
1 T dried Italian seasoning (can substitute fresh herbs)
In a large pot, saute the onion in the olive oil until the onion is translucent. Add the garlic and saute about one minute more. Add the tomatoes and crush them with your hands or against the side of the pot with a wooden spoon as you add them. Add the seasonings and stir.
Bring to a boil over medium high heat, reduce to a simmer and simmer for about 20 minutes. Remove the bay leaf.
Easy Blender Salsa (makes about 4 cups)
1 (15oz) can fire roasted tomatoes with green chiles (with liquid)
1 (15oz) can petite diced tomatoes (with liquid)
1/2 small onion, roughly chopped
3 cloves garlic, peeled
1.5 tsp. cumin
1 tsp. salt
1 lime, juiced
1/3 cup chopped fresh tomatoes
Add all ingredients to a blender (works best if you do it in the order they're listed). If you have a food processor, that would work as well.
Pulse to combine then blend on medium speed, gradually increasing until high speed until texture is nearly smooth.
Refrigerate for at least an hour before serving. Store leftovers in the refrigerator.
Friday, August 10, 2018
Cooking Class
Appetizers: Salsa and Chips
Main Course: Lasagna
Side Dishes: Salad, Chicken kebobs
Dessert: Coconut Cookies and Vanilla cake with marshmallow mousse, butter cream frosting, and candy
I had some equipment issues (mainly that I have no mixer and one oven) so we adjusted the dessert to coconut bars and chocolate marshmallow fudge, but I left the rest of the menu the same.
Our 4 main concepts were mis en place (the French phrase for having everything in its place and ready to use before you begin cooking), reading recipes, cleaning as you go, and timing. I told them the main challenge of cooking a meal as opposed to one dish is timing everything so that it's done at the right time and you don't need to have multiple things in the oven at one time. Originally, I planned to do the chicken kebobs in the oven since I don't really grill, but they wanted to grill so J took over that part and gave them a little grilling lesson while the lasagna was in the oven.
A couple of my take aways from the day . . .
* Kids really will eat things that they themselves help to make. It might only be a bite, but they will try new stuff
* Some of the basic ideas that we have known for a long time (which "tool" will work best for the job, how to measure dry vs wet ingredients) are new and need to be explained very simply
* I should trust my kids to do more cooking at home on a regular basis
We made 6 recipes in 8 hours and honestly, all of it turned out delicious. It was a lot of cleaning all day (the floor, the counters, washing pots), but totally worth it. They all had a blast and felt really proud of their efforts at the end of it.
Here's one recipe I'd like to share . . . it was a new one to me and turned out so good. My husband said he's prefer this to brownies. They are like a coconut blondie and the texture and flavor was just perfect.
I'll post more of our recipes from that day in a future post.
Chewy Coconut Bars (makes a 9x9 pan)
from Cookies and Cups blog
1/2 cup butter
2 cups light brown sugar
2 eggs
2 tsp vanilla
1/2 tsp kosher salt
1 tsp baking powder
1 cup flour
1.5 cups sweetened flaked coconut
Preheat oven to 350 degrees. Line a 9x9 pan with foil and coat with nonstick baking spray.
In a medium saucepan, melt butter over medium low heat. Once it's melted, continue cooking until it comes to a boil and starts to brown, stirring constantly so the butter doesn't burn. Reduce heat slightly and cook until the butter is an amber color. Remove from heat and stir in the brown sugar until completely combined (it won't dissolve). Using a rubber spatula, stir in the eggs, vanilla, and salt. Then, stir in the baking powder and flour and stir until fully incorporated. Last, stir in the coconut.
Pour the batter into the prepared pan and bake until golden. The edges should pull away from the pan and look crispy and the center will be barely set. The original recipe said 20 minutes but this took me closer to 35. After 20 -25 minutes, check it every 5 minutes or so. Cool completely before slicing into bars.
Thursday, August 9, 2018
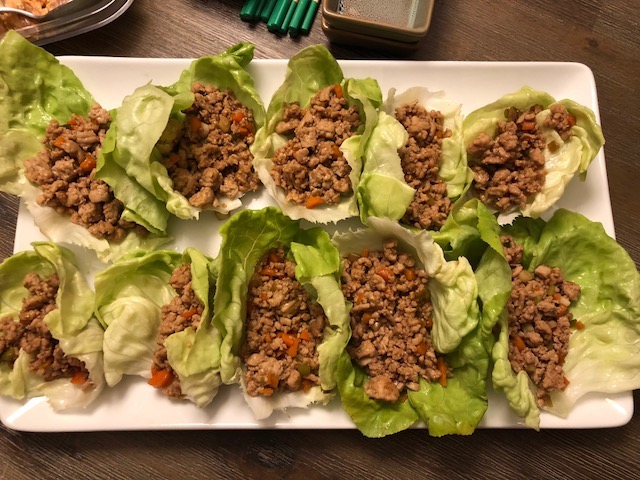
Chicken Lettuce Wraps
In addition to jumping off things and exploring marine life in its natural habitat, we've also been eating lots of fresh fish sashimi and poke this summer. I joke that Little is going to turn into Ahi tuna or get mercury poisoning but the other two don't love the raw fish so much. When we had friends over, I tried these lettuce wraps. They reminded me a little of the ones at PF Changs. They were super easy, healthy, and quick to the table so I have a feeling they'll go into regular rotation around here. You could sneak some extra veggies into the mix (shredded zucchini?) or add some extra spice (sriracha) because it's a good base recipe. I used butter lettuce leaves but iceberg or romaine would work or you could make the filling and put it over rice. If you're GF, check your hoisin and use a GF soy sauce.
Chicken Lettuce Wraps (serves 4)
from Every Day with Rachel Ray 2014
1 lb ground chicken
1 carrot
3 cloves garlic, minced
1 large head lettuce, leaves separated
4 scallions, whites and greens chopped
1/4 cup Hoisin sauce
1 T soy sauce (low sodium)
2 T vegetable oil
In a small bowl, combine hoisin, soy sauce, and 1/3 cup water.
Heat a large skillet over medium-high heat. Add 1 T of vegetable oil and the chicken and cook until chicken is browned (about 5 minutes).
Reduce heat to medium and add the carrot and remaining 1 T of vegetable oil. Cook for 2 minutes then add the garlic and the scallion whites and cook an additional minute. Stir in the hoisin mixture and continue to cook until the sauce thickens, another 1-2 minutes.
To serve, place some of the mixture in a lettuce leaf and top with some of the scallion greens.
Subscribe to:
Posts (Atom)