Index of Recipes
▼
Friday, January 29, 2010
Pie!
Okay, this is not the prettiest picture because we attacked this pie before I thought to pose a nice photo for the blog. It was so yummy . . . creamy, tart, and sweet. Like the lemon yogurt cake I made earlier this month, I was inspired to make this because of fresh lemons (this time from our tree) and because my husband hearts lemon desserts. For some reason, I'm really intimidated by double crust pies and when I see a good pie recipe with just a single crust, I pay attention.
Christina, from A Thinking Stomach, posted this recipe. If you haven't checked out her blog, you should. She lives in Altadena and is both a talented writer and cook. What I'm particularly impressed with is her commitment to local produce and her garden. (And she's an English teacher . . . we should be BFFs, huh?)
A couple of cooking notes: I reduced the sugar by a couple tablespoons and added a couple tablespoons more lemon juice for a tarter pie. The mixture suddenly thickens - you think it won't and then you have a glob so stir it constantly and pay attention. Full disclosure: I used a premade crust from Trader Joe's that I had leftover from Christmas.
Lemon Sour Cream Pie (serves . . . . um . . . 4 of us, probably 8 of you)
From A Thinking Kitchen
1 homemade prebaked pie crust
1 cup sugar
1/4 cup cornstarch
3 egg yolks, beaten
1 cup milk
1/4 cup butter
1/4 cup lemon juice
1 generous tablespoon of fine grated lemon zest
1 cup sour cream
Mix the sugar and cornstarch together in a saucepan. Add the egg yolks, milk, butter, lemon juice, and peel. Cook over medium heat, stirring constantly with a rubber spatula, until the mixture is thick. As soon as the mixture thickens, remove it from heat, scoop it into another container, and refrigerate it for at least two hours.
Once the mixture is cool, stir in the sour cream until completely combined. Pour the mixture into the pie shell and chill the entire pie until ready to serve.
If you want, make some "barely sweetened, vanilla-spiked whipped cream" and Just before serving, spread a generous layer of whipped cream over the surface of the filling. We left this part out because my husband likes his lemon stuff pretty sour.
Wednesday, January 27, 2010
Theresa's Enchiladas
My sister Theresa has great ideas for new recipes and creative ways to use the produce that she gets in her CSA. Recently, she was telling me about these Butternut Squash Enchiladas and I had to learn more. Here are the recipes, some photos, and her notes:
Butternut Squash Enchiladas
Tomatilla Sauce
For the enchiladas I also put some black beans in the filling and used a mexican cheese mix instead of the monterey jack/mozzarella recommended. I just didn't want to put mozzarella in enchiladas.
It was good, pretty easy, and parts or all of it can be prepared ahead of time. It made a lot, although I'm not entirely sure how much squash I had. I'm not good at estimating weights. I used 2 small/medium squash. And the squash baked in a little less than an hour. We had so much I froze some enchiladas... I'll let you know how that tastes when we eat it.
I've never made my own tomatilla sauce and now I'm especially motivated to give it a try - both of these recipes look awesome!
Friday, January 22, 2010
Peppered Beef Stroganoff
I've been missing the farmer's market in South Pas lately (Lisa - let's go when it's not raining!) so I bought some grass fed beef from Henry's in Monrovia last week. I was planning to make a nice Saturday dinner for my husband but we got invited to a birthday party and I didn't make this until Monday - the fanciest Monday night meal I've made in a long time.
I haven't been feeling like eating much meat lately but this tasted SO good to me - it was awesome and pretty easy to put together. Stroganoff isn't one of my favorite dishes and this is a lot different because it uses steak instead of ground beef and the dijon mustard in the sauce was a nice twist. I'm making it again on Sunday night for my cousins who are in town.
Couple of cooking notes: It cooks quickly so get your water boiling for the pasta well before you begin with the steaks and sauce. I used thin rib eyes (the grass fed ones are pretty lean) and pre-sliced mushrooms from Trader Joe's. You could probably use cooking Sherry or other wine in place of the brandy if you don't have any (Cognac would also work). Let me know if you like this!
Peppered Beef Stroganoff (serves 4)
from Bon Appetit January 2008
1 tablespoon coarsely ground black pepper
3 8-ounce beef tenderloin steaks
3 tablespoons olive oil, divided
8 ounces crimini (baby bella) mushrooms, sliced
1 1/4 cups beef broth
1 tablespoon brandy
1/2 cup whipping cream
1 tablespoon Dijon mustard
1 8.8-ounce package wide egg noodles (I used egg pappardelle from TJs)
1/4 cup chopped fresh Italian parsley
Sprinkle ground pepper and salt over both sides of steaks; press to adhere. Heat 1 tablespoon oil in large nonstick skillet over medium-high heat. Add steaks; cook to desired doneness, about 4 minutes per side for medium-rare. Transfer beef to plate; tent with foil. Add 1 tablespoon oil and mushrooms to same skillet; sauté until browned, about 4 minutes.
Add broth and brandy; boil 2 minutes. Add cream; boil until slightly thickened, about 5-15 minutes, depending on the consistency of sauce that you want. Whisk in mustard.
Meanwhile, cook noodles in pot of boiling salted water until just tender but still firm to bite, stirring occasionally. Drain. Return to pot; toss with parsley and 1 tablespoon oil. Season with salt and pepper. Divide among plates. Slice steaks; place atop noodles. Spoon sauce over.
Wednesday, January 20, 2010
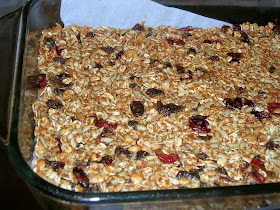
Homemade Granola Bars
I've been on a quest (word of the day on Sesame Street yesterday) to make homemade granola bars. My early attempts were taking my granola and trying to make it bar form during the baking process - didn't work. My next attempts were during my no sugar kick and the wet ingredients that were supposed to glue the bars together were insufficient and I ended up with a crumbly mess - not even great as granola.
I came across this online and my first batch was great. The method of toasting the dry, boiling the wet, and combining to cool worked well and I think that even if I change the ingredients, I'll stick with that method for awhile.
I have to admit that I wasn't super excited about the sugar and butter in the recipe, but I decided it was much better than buying granola bars, which I've been doing lately. The ingredients are really inexpensive for the amount of bars you can make and you know what all the ingredients are. Did you know that a Quaker Chewy Granola Bar contains "partially hydrogenated soybean and/or cottonseed oils, tocopherol, caramel color, artificial flavor, corn syrup, corn syrup solids, BHT" among other ingredients? The Nature's Path Organic Cranberry Ginger bars I've been buying don't have scary stuff in the ingredient list (tapioca syrup and acacia gum are the weirdest ones) but are much more expensive.
One other benefit of making your own is that you're avoiding all the packaging that comes with individually wrapped treats and helping the environment. Does anyone else use reusable snack bags like these? I'm thinking of investing in some.
I'll probably make some changes to this recipe to continue reducing the sugar without compromising the texture of the bar. They tasted really sweet to me this time around, but maybe it was just compared to those carrot oatmeal cookies. I'd also like to try crushed almonds in place of the peanuts for a different flavor (although my husband loves peanuts and loved them this way). Coconut and flaxseed would also be good additions.
Homemade Granola Bars
2 cups rolled oats
3/4 cup wheat germ
3/4 cup sunflower seeds
1 cup peanuts, crushed
1/2 cup brown sugar
1/2 cup honey
4 Tbsp butter
2 tsp vanilla extract
1 tsp cinnamon
1/2 tsp Kosher salt
approximately 8 oz. dried fruit (I used raisins, apricots, and cranberries)
Heat the oven to 400 degrees. Line a 9x13 pan with a large piece of parchment paper or waxed paper and spray it with cooking spray.
Combine the first 4 ingredients and spread them on a rimmed baking sheet. Toast in the oven, stirring occasionally, for 10-15 minutes. Don't let it burn!
Put the sugar, honey, butter, vanilla, cinnamon, and salt in a small saucepan and bring it to a boil stirring constantly.
When the toasted dry ingredients are done, stir them with the wet ingredients (the glue of the granola bars) and and dried fruit. Stir really well so it all gets moist. Spread it in the prepared pan and put another piece of parchment or waxed paper on top (or if your piece was big enough, fold it so it covers the top of the bars. Press down hard to make sure the ingredients are all compacted. I used a measuring cup and pressed it down all over the bars.
Let it completely cool (this is the hardest part - my kitchen smelled so good!). Then pull them out by the waxed paper and put them on a cutting board. Slice into the size granola bars you want. Keep in an airtight container with waxed paper between the layers or individually wrap them in plastic to take them with you.
Monday, January 18, 2010
Let's be apron girls
When I asked my daughter what she wanted to do on this rainy day, she said, "Let's be apron girls, mom." So, I looked through some recipes I'd been wanting to try and announced that we'd bake muffins. And she said, "No, cookies." I choose this cookie recipe because we had the ingredients on hand, there are no butter or eggs to bring to room temperature, and I knew I wouldn't feel guilty about letting her eat a few. She could also eat a big spoonful of the batter (honestly, her favorite part of baking) since there are no raw eggs. In fact, the recipe is vegan.
I haven't done much baking without white flour or sugar since before the holidays (except for Steph's banana oatmeal cookies) and this recipe did not disappoint me. Don't be put off by the maple syrup or the coconut oil - neither flavor dominates the final product. I think if you want more coconut flavor, some shredded coconut would be a nice addition. Without the usual cookie ingredients, I thought the texture might not be great but they were moist, and chewy like a good oatmeal cookie should be. They won't taste as sweet as "regular" cookies but my food critic declared them "yummy."
Carrot Oatmeal Cookies (makes 2 1/2 dozen)
from 101 Cookbooks
1 cup whole wheat pastry flour
1 teaspoon baking powder
1/2 teaspoon cinnamon
1/4 teaspoon ground ginger
scant 1/2 teaspoon sea salt
1 cup rolled oats
2/3 cup chopped walnuts
1 cup shredded carrots
1/2 cup real maple syrup, room temperature
1/2 cup coconut oil, warmed until just melted
Preheat oven to 375F degrees and line two baking sheets with parchment paper or silicone baking mats.
In a large bowl whisk together the flour, baking powder, salt, cinnamon, ginger, and oats. Add the nuts and carrots. In a separate smaller bowl use a whisk to combine the maple syrup and coconut oil (you can also do this in the pan you used to warm the coconut oil). Add this to the flour mixture and stir until just combined.
Drop onto prepared baking sheets, one tablespoonful at a time, leaving about 2 inches between each cookie. Mine didn't spread much and I got 15 cookies on each sheet. Bake for 10 - 12 minutes or until the cookies are golden on top and bottom.
Wednesday, January 13, 2010
Soba Noodle Salad
Have I told you about the guy I stalk at the South Pas Farmer's Market? No, not the Grass-Fed Beef guy (my new supplier of all things red meat), but the Granola guy (from Urban Green Cuisine / the Sweet Spot - can't find a website). When I was messing around with my granola recipe, I was trying to make my texture more like his so I'd try and subtly squeeze him for information each week as I tried a free sample.
And, then, I discovered his soba noodle salad. It was so good that I'd pay way too much for a little container and take it to work for lunch or serve it as a side dish for dinner. The good news is that making it yourself is WAY cheaper and really easy. Last night, I served it with seared ahi on top. As a main dish with the protein, it made two generous portions. As a side dish, you could maybe stretch it for four. I wish I had doubled the recipe so I'd have lots of leftovers to take to work this week. For those of you who might be unfamiliar with them, soba noodles are made from buckwheat and are usually in the Asian food section of the grocery store.
The dressing was awesome and I'll probably be using it in other ways (green salad, dipping sauce etc). The radish was a little overpowering so I might cut back the amount next time but you could easily leave it out if you don't like radishes. Maybe a little orange juice in the dressing or peeled orange segments in the salad would sweeten it up and be a nice contrast to the radish.
Soba Noodle Salad (Cooking Light 1/07)
6 oz uncooked soba
1/4 tsp. salt
1/4 tsp. pepper
1 c. finely chopped English cucumber
1 c. shredded carrot
1/2 c. julienne-cut radishes
1/3 c. finely chopped red bell pepper
1/4 c. chopped green onions
3 T rice vinegar
2 T low-sodium soy sauce
1 T peanut oil
1 1/2 tsp. dark sesame oil
1/2 tsp. crushed red pepper
2 T sesame seeds, toasted
Cook noodles according to package directions. Drain and rinse under cold water. Set aside. Combine the vinegar, soy sauce, peanut oil, sesame oil, and red pepper with a whisk in a small bowl. Chop all those vegetables up and mix them with the noodles, the salt and pepper, and the dressing. Top with sesame seeds.
Monday, January 11, 2010
Thai Red Curry Soup
One of my favorite flavor combinations is coconut and curry. Recently, I was thinking about the red curry from Saladang in Pasadena and I went searching online for some similar recipe to make. The hardest part about making this soup was finding the red curry paste - my third stop at Whole Foods finally resulted in success. The rest of it is pretty normal stuff. While it was cooking, I kept thinking it smelled fishy and thought it was the fish sauce (only 1 tablespoon) but then I remembered that I had fish sticks in the oven for my daughter to eat. If you're averse to using fish sauce, substitute soy sauce.
The soup was rich and flavorful but a little heavy. I think light coconut milk (or less coconut milk) would make it not seem so heavy. The eggplant was my favorite part of it - delicious - and I picked the chicken out of the leftover soup for lunch the next day and it tasted really good.
A couple of cooking notes: I served it over bean thread (thin translucent "noodles" made from mung beans) that I bought awhile ago at Cost Plus World Market but you can serve it plain like the recipe calls for, over hot cooked rice, or rice noodles instead. The base is really versatile so I think substituting or adding vegetables would be fine with this recipe. Red curry paste varies in intensity and spiciness. I started with 1 tablespoon and by the end, had added some red chili flakes and about 2 more tablespoons of the curry paste. Green curry paste would give a different flavor but would probably be great in this soup.
Thai Red Curry Soup with Chicken serves 4
(adapted from Bon Appetit 9/97)
2 T vegetable oil
1-3 T Thai red curry paste (see note above)
1/2 onion, sliced (I used 1 shallot)
12 oz. boneless skinless chicken breast halves, cut into 1/2 inch wide strips
4 oz. green beans, cut into 1 inch pieces
2 small Japanese eggplants, cut into 1 inch pieces
3 c. low-sodium chicken broth
3 c. unsweetened coconut milk
1 T fish sauce (nam pla)
1 cup chopped bok choy
1/4 c. chopped fresh basil
salt and pepper to taste
Heat the oill in a heavy large saucepan over medium heat. Add onion and saute until soft (2-3 minutes). Add curry paste and stir until fragrant, about 1 minute. Add chicken; stir 2 minutes. Add green beans and eggplant pieces; stir 1 minutes. Add broth, coconut milk and fish sauce. Bring to a boil. Reduce heat and simmer until the vegetables are tender, about 10-15 minutes. During the last five minutes, stir in the bok choy.
Taste and season with salt, pepper, red chili flakes and more curry paste, if desired. Sprinkle with basil and serve over noodles, rice or bean thread (or plain).
Saturday, January 9, 2010
Lemon Yogurt Cake
How cute is that apron? This picture doesn't even do it justice. One of my Christmas gifts to my daughter was this apron from Anthropologie. She loves it and will say, "Mom, let's be apron girls and do cooking today." She likes the smaller whisk that I have ("It's perfect for me, mom") and tasting the batter.
I decided to make this lemon cake when my friend Erika gave me some amazing Meyer lemons from her tree and my husband had a lousy day. The recipe is from Ina Garten (Barefoot Contessa at Home) and it got incredibly mixed reviews online - they would alternate between "the best cake I've ever made" to "I'll never make this horrible cake again." But still, I went ahead and made it.
I made a few changes to the recipe and we liked it a lot - great lemon flavor. However, the texture was sort of spongy and eggy so if you like more of a crumb texture, this might not be for you. The recipe is originally supposed to be made in a loaf pan but a major complaint of reviewers is that the sides and top got way too brown before the middle was cooked through so I put it in a 9 inch springform pan. I liked that it wasn't super thick. Don't skip the syrup part at the end!
Lemon Yogurt Cake (adapted from Ina Garten)
1 1/2 c. flour
2 tsp. baking powder
1/2 tsp. salt
1 c. plain yogurt (I used low-fat)
3/4 c. sugar
3 large eggs
2 tsp. grated lemon zest
3 T lemon juice
1/2 tsp. vanilla extract
1/3 c. vegetable oil
1/3 c. freshly squeezed lemon juice
1/3 c. sugar
Preheat oven to 325 degrees. Grease a springform pan. Whisk together the flour, baking powder and salt in a small bowl and set aside. In another bowl, whisk together the yogurt, sugar, eggs, lemon zest, 3 T lemon juice and vanilla extract.
Slowly whisk the dry ingredients into the wet ingredients. With a spatula, fold in the vegetable oil until it's all incorporated. Pour the bater into the pan and bake for 30-40 minutes or until a toothpick comes out clean and the top is slightly cracked.
While the cake is cooling for about 10 minutes, cook the 1/3c. lemon juice and the 1/3 c. sugar in a small pan until the sugar dissolves and the mixture is clear. Poke some holes in the cake with a fork and pour the syrup over it. Let it soak in and cool.
Tuesday, January 5, 2010
Happy 2010
Happy New Year everyone! One of the things I really enjoyed about 2009 was writing this blog . . . 103 entries to be exact! I'm hoping to keep up with it regularly in 2010 and I'm even planning a little give-away soon so be on the look out for that!
What are your food / diet / eating resolutions for 2010? Here are mine:
1) to keep cooking a healthy dinner at home at least 5 nights a week
2) to avoid any food product with ingredients that I don't recognize or can't pronounce (harder than it sounds . . . read those labels!)
3) to begin changing our meat consumption to organic free range poultry and grass-fed beef
4) to support local agriculture where I can (farmer's market and CSA).
I've been wondering why I have no new recipes to share with you all and it's mainly because after the holidays, I've been making old favorites that I've already posted here. This past week, I made corn chowder, BBQ Beef sandwiches, Chili Verde, and tonight I'm making the green soup. I promise to be more creative and have something new soon! I hope you have a happy and healthy 2010.